Skip to Content
Free Shipping over X amount
Operating Oxy/Fuel Torches
Complete instructions for setting up a propane, acetylene or other gas torch for soldering, casting and other jewelry operations. Covers set up, safe operation, and the proper way to turn off your torch. Download a pdf of Operating Oxy/Fuel Torches. You can also read a text description of this information below.
CAUTION: The following instructions are intended as general guidelines for setting up and using an oxygen/fuel torch. due to differences in torches, some information may not be accurate for a particular application. thoroughly read all safety information and instructions provided by the manufacturer. Contenti will not be held responsible for damage resulting from use of this information.
Setting Up The Torch
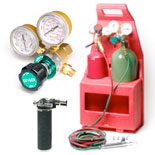
- Secure both Oxygen and Fuel Tanks to a wall, post, or in a tank caddy, in the upright position.
- With the valve opening pointed away from you, open the Oxygen Tank Valve and quickly close it. This will expell any dust particles from the valve opening. Do the same with the Fuel Tan
- Attach the Oxygen Regulator to the tank, tightening the nut with a wrench. Do not overtighten the nut as this may damage the fitting.
- Attach the Fuel Regulator to the fuel tank by turning the nut counter-clockwise. The fuel regulator nut has a left-hand thread, to prevent it from being installed on oxygen tanks by mistake. Secure the nut with a wrench, without overtightening.
- Attach one end of your Hose Set to the Oxygen and Fuel Regulators and the other end to your Torch Body. The Red colored hose is used for fuel and has left-hand threaded connectors. The Green hose (sometimes, Blue colored) has standard connectors with right-hand thread.
- Position the torch and hoses so that they do not become tangled or damaged. Maintain a safe distance between your work area and the tanks.
Turning On The Torch
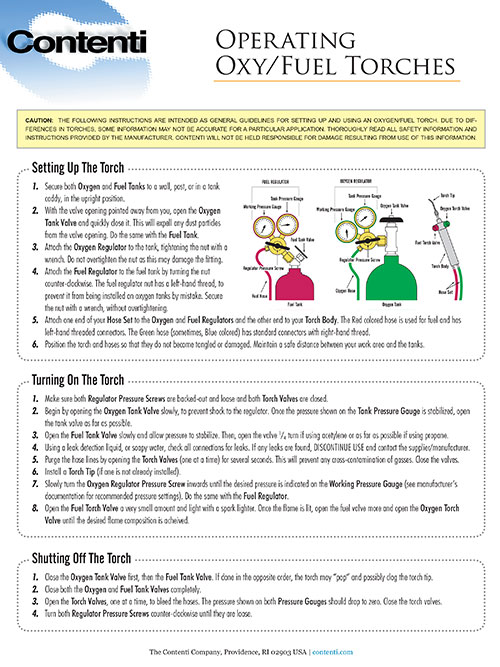
- Make sure both Regulator Pressure Screws are backed-out and loose and both Torch Valves are closed.
- Begin by opening the Oxygen Tank Valve slowly, to prevent shock to the regulator. Once the pressure shown on the Tank Pressure Gauge is stabilized, open the tank valve as far as possible.
- Open the Fuel Tank Valve slowly and allow pressure to stabilize. Then, open the valve 1/4 turn if using acetylene or as far as possible if using propane.
- Using approved leak detection liquid check all connections for leaks. If any leaks are found, DISCONTINUE USE and contact the supplier/manufacturer.
- Purge the hose lines by opening the Torch Valves (one at a time) for several seconds. This will prevent any cross-contamination of gasses. Close the valves.
- Install a Torch Tip (if one is not already installed).
- Slowly turn the Oxygen Regulator Pressure Screw inwards until the desired pressure is indicated on the Working Pressure Gauge (see manufacturer’s documentation for recommended pressure settings). Do the same with the Fuel Regulator.
- Open the Fuel Torch Valve a very small amount and light with a spark lighter. Once the flame is lit, open the fuel valve more and open the Oxygen Torch Valve until the desired flame composition is acheived.
Shutting Off The Torch
- Close the Oxygen Tank Valve first, then the Fuel Tank Valve. If done in the opposite order, the torch may “pop“ and possibly clog the torch tip.
- Close both the Oxygen and Fuel Tank Valves completely.
- Open the Torch Valves, one at a time, to bleed the hoses. The pressure shown on both Pressure Gauges should drop to zero. Close the torch valves.
- Turn both Regulator Pressure Screws counter-clockwise until they are loose.